How to Create Mintegral Playable Ads Tutorial

How to Create Mintegral Playable Ads in 2DKit

Follow these steps to create and publish your Mintegral Playable Ads for Mintegral Ad Network.

Overview

This guide will show you how to create and publish playable ads for Mintegral Ads with 2DKit in just a couple minutes.

2DKit supports one-click publishing for Mintegral Ads playable ad creatives.

The total file size of this playable ad, a Shoot ‘Em Up game will be 239 KB (without gzip).

Since 2DKit delivers such small file sizes it is easy to stay under Mintegral’s 5 MB limit.

The published build contains a zip file with all of the assets and code self-contained in a single index.html without the need for any additional assets.

Additionally all of the Mintegral’s requirements and API integration are automatically handled when 2DKit projects are published as Mintegral Playable Ads.

Sample Project

http://developer.2dkit.com/samples/playable-ad-shmup.zip

Handling the Call to Action

Handling the call to action with an Action in 2DKit Creator.

Drag the NotifyAdClicked action from the ez package folder.

This will call window.install && window.install();  if available.

A good place to put this call to action is in an end card game over screen.
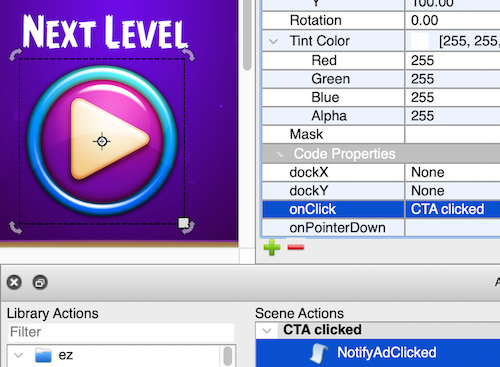
Handling the call to action with code.

Add the following code to your game to handle the call to action.

System.notifyAdClicked();

This will call window.install && window.install(); if available.

Publishing the Ad

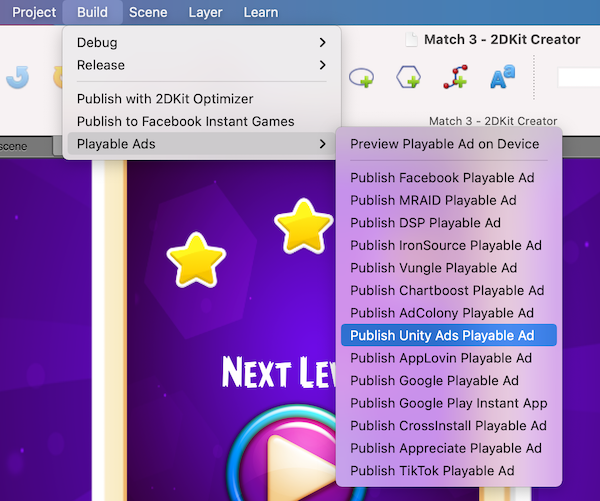
To publish select the following menu option in 2DKit Creator:

Build->Playable Ads->Publish Mintegral Playable Ad

2DKit will handle building the output in a way that is consistent with Mintegral Ads’ requirements.

In addition 2DKit will also automatically optimize all files in a way that typically results in a 70-90% reduction in file size.

In the received zip file, unzip and locate the html file to verify that everything is in one self-contained file.

Final Deliverable

The zip file is the only file that should be delivered for Mintegral Ads. 

Playable Ad Settings

After you create your playable ad in 2DKit Creator select

Project->Project Settings

Then select the Playable Ads tab.

Testing in the Mintegral Tool

To test go here, upload the zip file, play through it, and verify that the app store click works properly.

https://www.mindworks-creative.com/review/

Relevant Classes

http://developer.2dkit.com/api/ez/NotifyAdClicked.html

http://developer.2dkit.com/api/kit/System.html#notifyAdClicked

More info

2DKit Playable Ads Guide

How to Create TikTok Playable Ads Tutorial

Create TikTok Playable Ads Tutorial

Follow these steps to create and publish playable ads for TikTok Ads.

Overview

This guide will show you how to create and publish playable ads for TikTok Ads with 2DKit in just a couple minutes using your videos and images with easy-to-use 2DKit templates.

2DKit supports one-click publishing for TikTok Ads playable ad creatives.

The total file size of this playable ad, a Shoot ‘Em Up game will be 239 KB (without gzip).

Since 2DKit delivers such small file sizes it is easy to stay under TikTok‘s 3 MB limit.

The published build contains a zip file with an index.html in the folder root.

Additionally all of the TikTok’s requirements and API integration are automatically handled when 2DKit projects are published as TikTok Playable Ads.

Video Tutorial

Play Now: TikTok Playable Ads 2DKit Tutorial

Sample Project

http://developer.2dkit.com/samples/playable-ad-shmup.zip

Handling the Call to Action

Handling the call to action with an Action in 2DKit Creator.

Drag the NotifyAdClicked action from the ez package folder.

This will call window.openAppStore();  if available.

A good place to put this call to action is in an end card game over screen.

Handling the call to action with code.

Add the following code to your game to handle the call to action.

System.notifyAdClicked();

This will call window.openAppStore(); if available.

Publishing the Ad

To publish select the following menu option in 2DKit Creator:

Build->Playable Ads->Publish TikTok Playable Ad

2DKit will handle building the output in a way that is consistent with TikTok Ads’ requirements.

In addition 2DKit will also automatically optimize all files in a way that typically results in a 70-90% reduction in file size.

In the received zip file, unzip and locate the html file to verify that the index.html file is present.

Final Deliverable

The tiktok_ad.zip file is the only file that should be delivered for TikTok Ads. 

Playable Ad Settings

After you create your playable ad in 2DKit Creator select

Project->Project Settings

Then select the Playable Ads tab.

Testing in the TikTok Tool

Go to Tiktok Ads Manager -> Assets -> Creative

Then select the Playable Ads tab

Click Upload button

Then you will see an interactive preview and you can get a URL and a QR code.

Relevant Classes

http://developer.2dkit.com/api/ez/NotifyAdClicked.html

http://developer.2dkit.com/api/kit/System.html#notifyAdClicked

More info

2DKit Playable Ads Guide

How to Create CrossInstall Playable Ads Tutorial

CrossInstall

Playable Ads Tutorial :

How to Create Playable Ads for CrossInstall

Follow these steps to create and publish CrossInstall ( MoPub / Twitter ) playable ads.

Overview

This guide will show you how to create and publish a playable ad for CrossInstall with 2DKit in just a couple minutes.

The total file size of this playable ad, a Shoot ‘Em Up game will be 239 KB (without gzip).

Sample Project

http://developer.2dkit.com/samples/playable-ad-shmup.zip

Relevant Classes

http://developer.2dkit.com/api/ez/NotifyAdClicked.html

http://developer.2dkit.com/api/kit/System.html#notifyAdClicked

Handling the Call to Action

Handling the call to action with an Action in 2DKit Creator.

Drag the NotifyAdClicked action from the ez package folder.

When published for CrossInstall, this will call ( window.parent.postMessage(‘click_go’, ‘*’ ).

A good place to put this call to action is in an end card game over screen.

Handling the call to action with code.

Add the following code to your game to handle the call to action.

System.notifyAdClicked();

When published for CrossInstall, this will call ( window.parent.postMessage(‘click_go’, ‘*’ ).

Publishing the Ad

To publish select the following menu option in 2DKit Creator:

Build->Publish CrossInstall Ad

2DKit will handle building the output in a way that is consistent with CrossInstall’s requirements.

In addition 2DKit will also automatically optimize all files in a way that typically results in a 70-90% reduction in file size.

You will receive a zip containing the html file that should be used in the campaign.

You will also receive a working link that can be used to streamline testing and iteration as described below.

Testing with Creative Preview App

Creative Preview is an Android and iOS mobile app for previewing mobile creatives on a phone or tablet.

After installing the Creative Preview app, following these steps to manually add a creative from the 2DKit URL you receive after publishing.

  1. Tap Add add creative button, then tap Display.
  2. Enter a name for the preview.
  3. Enter the creative’s URL you received after publishing via 2DKit (e.g. https://youridgoeshere.apps.2dkit.com/crossinstall-ad) .
  4. Select the ad type,”Interstitial”. 
  5. Enter the width and height of the creative.
  6. Tap the Load Interstitial button (if displayed).
  7. You should now see the creative displayed on your device.

Note that in order to test the CTA (call to action) click, the creative must be deployed to CrossInstall.

How to Create AppLovin Playable Ads Tutorial

How to Create AppLovin Playable Ads in 2DKit

Follow these steps to create and publish your playable ads for AppLovin ad network.

Overview

This guide will show you how to create and publish playable ads for AppLovin ad network with 2DKit in just a couple minutes.

The total file size of this playable ad, a Shoot ‘Em Up game will be 239 KB (without gzip).

Sample Project

http://developer.2dkit.com/samples/playable-ad-shmup.zip

Playable Ad Settings

After you create your playable ad in 2DKit Creator select

Project->Project Settings

Then select the Playable Ads tab.

Enter the Google Play and Apple AppStore URLs for your promoted app.

Note: some testers require an AppStore URL that begins with itunes.apple.com instead of apps.apple.com.

Handling the Call to Action

Handling the call to action with an Action in 2DKit Creator.

Drag the NotifyAdClicked action from the ez package folder.

This will call mraid.open() or mraid.openStoreUrl() if available.

A good place to put this call to action is in an end card game over screen.

Handling the call to action with code.

Add the following code to your game to handle the call to action.

System.notifyAdClicked();

This will call mraid.open() or mraid.openStoreUrl() if available.

Publishing the Ad

To publish select the following menu option in 2DKit Creator:

Build->Playable Ads->Publish AppLovin Playable Ad

2DKit will handle building the output in a way that is consistent with AppLovin’s requirements.

In addition 2DKit will also automatically optimize all files in a way that typically results in a 70-90% reduction in file size.

In the received zip file, unzip and locate the folder named applovin-ad.

Then locate the index.html file the the applovin-ad folder, which is a single html file with no external assets,

Testing Applovin

To test go here and upload the index.html file.

Click Here: AppLovin Playable Preview Tool

Make sure the above URL ends with &qr=1 in order to get the QR code for the next step.

Device Testing Applovin

Then open the QR code received in the step above in the Applovin iOS and Android apps here–

iOS and Android.

Testing MRAID

To test go here and select the MRAID 2.0 and Interstitial option.

http://webtester.mraid.org/

Review that all of the specs in the Prepare tab match the settings for the device you are planning to launch on

  1. Change the Default ad size (w x h) to 320 x 480 so you can get the full screen experience
  2. Change Default ad position (top, left) to 0, 0
  3. From Placement drop-down menu, select “Interstitial”
  4. Optional: Uncheck all the options for “Native features to emulate”
  5. Select Next button
  6. Paste MRAID tags (received from 2DKit) in the Flight tab and click Render
  7. Play through and click the CTA to verify it shows a confirmation about the CTA being clicked.
  8. Review the test window and the console windows to verify that everything looks good and there are no errors.

MraidProperties

Relevant Classes

http://developer.2dkit.com/api/ez/NotifyAdClicked.html

http://developer.2dkit.com/api/kit/System.html#notifyAdClicked
More info

https://www.iab.com/wp-content/uploads/2015/08/IAB_MRAID_v2_FINAL.pdf

How to Create AdColony Playable Ads Tutorial

How to Create AdColony Playable Ads with 2DKit

Follow these steps to create and publish AdColony playable ads for AdColony ad network.

Overview

This guide will show you how to create and publish playable ads for AdColony ad network with 2DKit in just a couple minutes.

The total file size of this playable ad, a Shoot ‘Em Up game will be 239 KB (without gzip).

Sample Project

http://developer.2dkit.com/samples/playable-ad-shmup.zip

Relevant Classes

http://developer.2dkit.com/api/ez/NotifyAdClicked.html

http://developer.2dkit.com/api/kit/System.html#notifyAdClicked

Playable Ad Settings

After you create your playable ad in 2DKit Creator select

Project->Project Settings

Then select the Playable Ads tab.

Enter the Google Play and Apple AppStore URLs for your promoted app.

Note: some testers require an AppStore URL that begins with itunes.apple.com instead of apps.apple.com.

Handling the Call to Action

Handling the call to action with an Action in 2DKit Creator.

Drag the NotifyAdClicked action from the ez package folder.

This will call mraid.open() or mraid.openStoreUrl() if available.

A good place to put this call to action is in an end card game over screen.

Handling the call to action with code.

Add the following code to your game to handle the call to action.

System.notifyAdClicked();

This will call mraid.open() or mraid.openStoreUrl() if available.

Publishing the Ad

To publish select the following menu option in 2DKit Creator:

Build->Playable Ads->Publish AdColony Playable Ad

2DKit will handle building the output in a way that is consistent with AdColony’s requirements.

In addition 2DKit will also automatically optimize all files in a way that typically results in a 70-90% reduction in file size.

In the received zip file, unzip and locate the folder named adcolony-ad.

All the required files can be found in this folder.

Testing

To test go here and select the MRAID 2.0 and Interstitial option.

http://webtester.mraid.org/

Review that all of the specs in the Prepare tab match the settings for the device you are planning to launch on

  1. Change the Default ad size (w x h) to 320 x 480 so you can get the full screen experience
  2. Change Default ad position (top, left) to 0, 0
  3. From Placement drop-down menu, select “Interstitial”
  4. Optional: Uncheck all the options for “Native features to emulate”
  5. Select Next button
  6. Paste MRAID tags (received from 2DKit) in the Flight tab and click Render
  7. Play through and click the CTA to verify it shows a confirmation about the CTA being clicked.
  8. Review the test window and the console windows to verify that everything looks good and there are no errors.

MraidProperties

More info

https://www.iab.com/wp-content/uploads/2015/08/IAB_MRAID_v2_FINAL.pdf

How to Create Chartboost Playable Ads Tutorial

Chartboost

Playable Ads Tutorial :

How to Create Playable Ads for Chartboost

Follow these steps to create and publish playable ads for Chartboost.

Overview

This guide will show you how to create and publish playable ads for Chartboost ad network with 2DKit in just a couple minutes.

The total file size of this playable ad, a Shoot ‘Em Up game will be 239 KB (without gzip).

Sample Project

http://developer.2dkit.com/samples/playable-ad-shmup.zip

Relevant Classes

http://developer.2dkit.com/api/ez/NotifyAdClicked.html

http://developer.2dkit.com/api/kit/System.html#notifyAdClicked

Playable Ad Settings

After you create your playable ad in 2DKit Creator select

Project->Project Settings

Then select the Playable Ads tab.

Enter the Google Play and Apple AppStore URLs for your promoted app.

Note: some testers require an AppStore URL that begins with itunes.apple.com instead of apps.apple.com.

Handling the Call to Action

Handling the call to action with an Action in 2DKit Creator.

Drag the NotifyAdClicked action from the ez package folder.

This will call mraid.open() or mraid.openStoreUrl() if available.

A good place to put this call to action is in an end card game over screen.

Handling the call to action with code.

Add the following code to your game to handle the call to action.

System.notifyAdClicked();

This will call mraid.open() or mraid.openStoreUrl() if available.

Publishing the Ad

To publish select the following menu option in 2DKit Creator:

Build->Playable Ads->Publish Chartboost Playable Ad

2DKit will handle building the output in a way that is consistent with Chartboost’s requirements.

In addition 2DKit will also automatically optimize all files in a way that typically results in a 70-90% reduction in file size.

In the received zip file, unzip and locate the folder named chartboost-ad.

The MRAID tags will be sent along with the zip.

Single html file with all assets embedded

For networks that require a single html file with no external assets, use the index.html file the the mraid-ad folder.

Self-hosting

If self-hosting is preferred from the received zip file, unzip and locate the folder named chartboost-ad and upload it to your server.

Testing

To test go here and select the MRAID 2.0 and Interstitial option.

http://webtester.mraid.org/

Review that all of the specs in the Prepare tab match the settings for the device you are planning to launch on

  1. Change the Default ad size (w x h) to 320 x 480 so you can get the full screen experience
  2. Change Default ad position (top, left) to 0, 0
  3. From Placement drop-down menu, select “Interstitial”
  4. Optional: Uncheck all the options for “Native features to emulate”
  5. Select Next button
  6. Paste MRAID tags (received from 2DKit) in the Flight tab and click Render
  7. Play through and click the CTA to verify it shows a confirmation about the CTA being clicked.
  8. Review the test window and the console windows to verify that everything looks good and there are no errors.

MraidProperties

More info

https://www.iab.com/wp-content/uploads/2015/08/IAB_MRAID_v2_FINAL.pdf

How to Create Vungle Playable Ads Tutorial

How to Create a Vungle

Playable Ad with 2DKit

Follow these steps to create and publish Vungle

playable ads for Vungle ad network.

Overview

This guide will show you how to create and publish playable ads for Vungle ad network with 2DKit in just a couple minutes.

The total file size of this playable ad, a Shoot ‘Em Up game will be 239 KB (without gzip).

Sample Project

http://developer.2dkit.com/samples/playable-ad-shmup.zip

Relevant Classes

http://developer.2dkit.com/api/ez/NotifyAdClicked.html

http://developer.2dkit.com/api/kit/System.html#notifyAdClicked

Playable Ad Settings

After you create your playable ad in 2DKit Creator select

Project->Project Settings

Then select the Playable Ads tab.

Enter the Google Play and Apple AppStore URLs for your promoted app.

Note: some testers require an AppStore URL that begins with itunes.apple.com instead of apps.apple.com.

Handling the Call to Action

Handling the call to action with an Action in 2DKit Creator.

Drag the NotifyAdClicked action from the ez package folder.

This will call parent.postMessage(‘download’,‘*’).

A good place to put this call to action is in an end card game over screen.

Handling the call to action with code.

Add the following code to your game to handle the call to action.

System.notifyAdClicked();

This will call parent.postMessage(‘download’,‘*’).

Publishing the Ad

To publish select the following menu option in 2DKit Creator:

Build->Playable Ads->Publish Vungle Playable Ad

2DKit will handle building the output in a way that is consistent with Vungle’s requirements.

In addition 2DKit will also automatically optimize all files in a way that typically results in a 70-90% reduction in file size.

In the received zip file, unzip and locate the folder named vungle-ad.

All the required files can be found in this folder.  For example, you will see ad.html in this folder.

How to Create IronSource Playable Ads Tutorial

How to Create IronSource Playable Ads in 2DKit

Follow these steps to create and publish playable ads for IronSource.

Overview

This guide will show you how to create and publish playable ads for IronSource ad network (DAPI or MRAID) with 2DKit in just a couple minutes.

The total file size of this playable ad, a Shoot ‘Em Up game will be 239 KB (without gzip).

Sample Project

http://developer.2dkit.com/samples/playable-ad-shmup.zip

Handling the Call to Action

Handling the call to action with an Action in 2DKit Creator.

Drag the NotifyAdClicked action from the ez package folder.

This will call dapi.openStoreUrl().

A good place to put this call to action is in an end card game over screen.

Handling the call to action with code.

Add the following code to your game to handle the call to action.

System.notifyAdClicked();

This will call dapi.openStoreUrl().

Publishing the Ad

To publish select the following menu option in 2DKit Creator:

Build->Playable Ads->Publish IronSource Playable Ad

2DKit will handle building the output in a way that is consistent with IronSource requirements, including the DAPI format.

In addition 2DKit will also automatically optimize all files in a way that typically results in a 70-90% reduction in file size.

In the received zip file, unzip and locate the folder named dapi-ad.

The single index.html is what you should use.  It has all assets included in it.

If you prefer IronSource’s MRAID option you can also publish using Publish MRAID Playable Ad from 2DKit’s build menu.

Testing

To test go here and select the DAPI option and follow the steps to verify that the exported build meets IronSource’s requirements.  This tool also allows you to verify that the CTA click will properly go to the app store.

https://demos.ironsrc.com/test-tool/?adUnitLoader=dapi&mode=testing

Submission

After testing is complete follow the steps here to submit your playable:

https://developers.ironsrc.com/ironsource-mobile/general/submit-playable-qa/

Relevant Classes

http://developer.2dkit.com/api/ez/NotifyAdClicked.html

http://developer.2dkit.com/api/kit/System.html#notifyAdClicked

How to Create Unity Playable Ads Tutorial

Unity Playable Ads Tutorial :

How to Create for Unity Ad Network

Follow these steps to create and publish your Unity playable ads for Unity Ads ad network.

Overview

This guide will show you how to create and publish playable ads for Unity Ad Network with 2DKit in just a couple minutes.

2DKit supports one-click publishing for Unity Ad Network playable ad creatives.

The total file size of this playable ad, a Shoot ‘Em Up game will be 239 KB (without gzip).

The published build contains a standalone index.html file with all of the assets and code self-contained without the need for any additional assets.

Additionally all of the following requirements are automatically handled when 2DKit projects are published as Unity Playable Ads.

Playable ads have the following required specifications:

  • Use a single HTML.index file.
  • The index.html file must be inlined, with no links to other files or folders.
  • The file must be minified (optimized for machine-reading by removing empty spaces). 
  • The file must be under 5MB.
  • The ad must comply with Mobile Rich Media Ad Interface Definitions (MRAID) 2.0 guidelines

In addition, Unity requires the following specifications outside of MRAID:

  • Android games must use Android version 4.4 or higher.
  • iOS games must use iOS version 8.0 or higher.
  • Ads should support both portrait and landscape orientations. 
  • Ads should not need any network requests (XHR).
  • Ads should link directly to the app store using mraid.open
  • Wait for the MRAID viewableChange event before starting the playable content.

Playable Ad Settings

After you create your playable ad in 2DKit Creator select

Project->Project Settings

Then select the Playable Ads tab.

Enter the Google Play and Apple AppStore URLs for your promoted app.

Handling the Call to Action

Handling the call to action with an Action in 2DKit Creator.

Drag the NotifyAdClicked action from the ez package folder.

This will call mraid.open() or mraid.openStoreUrl() if available.

A good place to put this call to action is in an end card game over screen.

Handling the call to action with code.

Add the following code to your game to handle the call to action.

System.notifyAdClicked();

This will call mraid.open() or mraid.openStoreUrl() if available.

Publishing the Ad

To publish select the following menu option in 2DKit Creator:

Build->Playable Ads->Publish Unity Playable Ad

2DKit will handle building the output in a way that is consistent with Unity Ads’ requirements.

In addition 2DKit will also automatically optimize all files in a way that typically results in a 70-90% reduction in file size.

In the received zip file, unzip and locate the folder named unity-ad.

Final Deliverable

The index.html is the only file that should be delivered for Unity Ads. 

Testing in the Test App

Follow these steps to test with the Unity Ad Testing app.

  1. Download the Unity Ad Testing mobile app for Android and iOS.
  2. Enter the Playable URL you received after publishing via 2DKit  (e.g. https://youridgoeshere.apps.2dkit.com/unity-ad/index.html ) .
  3. Tap Initialize.
  4. Tap Show.

Testing MRAID

To test go here and select the MRAID 2.0 and Interstitial option.

https://github.com/mraid/webtester

http://webtester.mraid.org/

Review that all of the specs in the Prepare tab match the settings for the device you are planning to launch on

  1. Change the Default ad size (w x h) to 320 x 480 so you can get the full screen experience
  2. Change Default ad position (top, left) to 0, 0
  3. From Placement drop-down menu, select “Interstitial”
  4. Optional: Uncheck all the options for “Native features to emulate”
  5. Select Next button
  6. Paste MRAID tags (received from 2DKit) in the Flight tab and click Render
  7. Play through and click the CTA to verify it shows a confirmation about the CTA being clicked.
  8. Review the test window and the console windows to verify that everything looks good and there are no errors.

MraidProperties

Sample Project

http://developer.2dkit.com/samples/playable-ad-shmup.zip

Relevant Classes

http://developer.2dkit.com/api/ez/NotifyAdClicked.html

http://developer.2dkit.com/api/kit/System.html#notifyAdClicked

More info

2DKit Playable Ads Guide

How to Create Fyber Playable Ads Tutorial

How to Create Fyber Playable Ads Tutorial

Follow these steps to create and publish Fyber playable ads.

Overview

This guide will show you how to create and publish playable ads for Fyber ad network with 2DKit in just a couple minutes.

The total file size of this playable ad, a Shoot ‘Em Up game will be 239 KB (without gzip).

Sample Project

http://developer.2dkit.com/samples/playable-ad-shmup.zip

Relevant Classes

http://developer.2dkit.com/api/ez/NotifyAdClicked.html

http://developer.2dkit.com/api/kit/System.html#notifyAdClicked

Playable Ad Settings

After you create your playable ad in 2DKit Creator select

Project->Project Settings

Then select the Playable Ads tab.

Enter the Google Play and Apple AppStore URLs for your promoted app.

Note: some testers require an AppStore URL that begins with itunes.apple.com instead of apps.apple.com.

Handling the Call to Action

Handling the call to action with an Action in 2DKit Creator.

Drag the NotifyAdClicked action from the ez package folder.

This will call mraid.open() or mraid.openStoreUrl() if available.

A good place to put this call to action is in an end card game over screen.

Handling the call to action with code.

Add the following code to your game to handle the call to action.

System.notifyAdClicked();

This will call mraid.open() or mraid.openStoreUrl() if available.

Publishing the Ad

To publish select the following menu option in 2DKit Creator:

Build->Playable Ads->Publish Fyber Playable Ad

2DKit will handle building the output in a way that is consistent with Fyber’s requirements.

In addition 2DKit will also automatically optimize all files in a way that typically results in a 70-90% reduction in file size.

In the received zip file, unzip and locate the folder named mraid-ad.

The MRAID tags can be found in the zip.

Self-hosting

If self-hosting is preferred from the received zip file, unzip and locate the folder named mraid-ad and upload it to your server.

Testing

To test go here and select the MRAID 2.0 and Interstitial option.

http://webtester.mraid.org/

Review that all of the specs in the Prepare tab match the settings for the device you are planning to launch on

  1. Change the Default ad size (w x h) to 320 x 480 so you can get the full screen experience
  2. Change Default ad position (top, left) to 0, 0
  3. From Placement drop-down menu, select “Interstitial”
  4. Optional: Uncheck all the options for “Native features to emulate”
  5. Select Next button
  6. Paste MRAID tags (received from 2DKit) in the Flight tab and click Render
  7. Play through and click the CTA to verify it shows a confirmation about the CTA being clicked.
  8. Review the test window and the console windows to verify that everything looks good and there are no errors.

MraidProperties

More info

https://www.iab.com/wp-content/uploads/2015/08/IAB_MRAID_v2_FINAL.pdf